
I have always been a little bit of a picky eater. It’s more of a texture thing for me than anything else; things that are slimy or stringy I have a really hard time with, like cooked greens, squash, or okra. So, you can imagine my initial response to kombucha, with it’s little stringy strands of goo in the bottom and, when it’s plain, its acquired taste. However, after my diagnosis and looking into the impact of gut health on our immunity and how good fermented foods are for our gut health, I was convinced to give kombucha a try. And you know what? I love it! So much so that I even started making it myself, and in this post I am going to tell you how you can too. It’s much easier than you might think, and what better time to try something new than when you are stuck inside in quarantine? Learning how to and making it is the perfect way to spend some of this time!
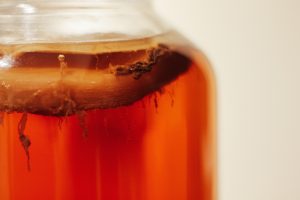 Goo strings? Acquired taste? What the heck is this stuff??
Kombucha has been gaining immense popularity in recent years and it has started to pop up all over the place, even being offered on tap at many restaurants. For those who haven’t come across it though, kombucha is a fermented tea (usually black or green tea) that here in the West is often flavoured with fruit and/or sweet spices like cinnamon, cloves, and ginger.
Kombucha first showed up in Northeast China around 220 B.C., where it was used in Chinese medicine for its healing properties. Since then, it has spread all over the world, from Russia to California, seeing a particular rise in popularity after the 1960s when a Switzerland study compared its health benefits to those of yogurt [1].
Kombucha is made by brewing tea and placing a kombucha SCOBY into it. A SCOBY is a round, gelatinous culture of healthy, good bacteria and yeast that looks a bit like a thinner, rubbery hockey puck, and it’s what allows the kombucha to ferment. You then add some of your previous batch of kombucha to it (or vinegar if it is the first batch you are making) and some sugar, and then let your kombucha sit for a few weeks somewhere dark and cool to allow the bacteria and yeast in the SCOBY to eat all of the sugar and ferment the tea. You can then strain it and flavour it however you would like. It’s as easy as that!
Kombucha has a lovely, light carbonation and a slightly sour taste that I don’t mind at all and find is a great substitute for wine or beer if you are avoiding alcohol right now post-diagnosis. If you are concerned about the taste of raw, unflavoured kombucha, don’t worry! You can flavour it however you want with various fruits and spices. My favourite to do at home is maple ginger blueberry (I have included the recipe for this homemade flavour infusion below), but the sky is really the limit when it comes to flavourings.
 But, what does the gut and kombucha have to do with cancer?
You may be wondering why we’re talking about kombucha in relation to integrative cancer care, and that’s a fair question. I have talked about the connection between gut health and our immune system before, but if you haven’t learned about this previously, here is a brief overview.
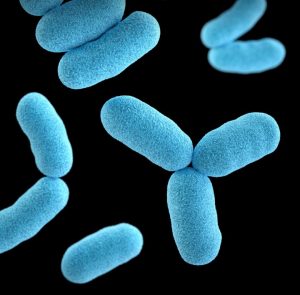
There is quite an interplay between our gut microbiome (the interconnected community of bacteria and microbes that lives in our intestines, some good and some bad) and our immune system, with the gut wall containing 70% of the cells that make up our immune system [2]. Your gut houses about 3 pounds of bacteria [2] (yup, you read that right, 3 POUNDS), so it’s no wonder that they affect the immune system when so much of that system is housed side-by-side with these microbes. “The gut microbiota that resides in the gastrointestinal tract provides essential health benefits to its host, particularly by regulating immune homeostasis. Moreover, it has recently become obvious that alterations of these gut microbial communities can cause immune dysregulation, leading to autoimmune disorders” [3].
We all know that it is the job of certain cells in our immune system to find and destroy circulating tumour cells and cancer stem cells. When our immunity is lowered, these cells cannot do their job as well, and cancer cells are more likely to slip through the cracks and be allowed to take up residence somewhere, eventually leading to a tumour. There is also research to suggest that an unhealthy, inflamed gut can lead to more aggressive cancer and earlier metastasis. “Disrupting the microbiome resulted in long-term inflammation within the tissue and the tumor environment […] Ultimately, based upon these findings, we would speculate that an unhealthy microbiome contributes to increased invasion and a higher incidence of metastatic disease” [4].
 How do fermented foods like kombucha fit in?
Now that you know how gut health is connected to cancer, I’m sure you are wondering how you can support the health of your gut. There are many ways, but one of the easiest is by including fermented foods in your diet like sauerkraut, kimchi, tempeh, pickled vegetables, and, you guessed it, kombucha.
Research has shown that fermented foods “[…] contain health-promoting components, can be used as a probiotic carrier, can contribute to the diversity of gut microbiome, and indirectly impact on mental health and other disorders […] A higher bioactive molecule content and an improved antioxidant activity were found in fermented milks, cereals, fruit and vegetables, meat and fish. Fermented milk and fruit juice were found to have probiotic activity” [5]. Fermented foods and probiotics (bacteria and yeasts that are good for you) have even been found to influence human well-being, their subsequent enhancement of the gut microbiome possibly having a modulatory effect on the brain and the central nervous system [5].
Our ancestors didn’t have refrigeration, and so fermented foods were a regular part of their diet simply because it was one of the only ways to preserve foods. Now, we have to make a little more effort to include them because with the advent of refrigeration and preservatives it’s not something that we have to do. Making your own kombucha so you always have it on hand is a great way to ensure that you are including gut-buddy-packed foods in your diet. Plus, like everything from the health food world that goes mainstream, kombucha has become increasingly expensive as it has become increasingly popular, so making your own is a great way to save money as it is surprisingly cheap. As you will see below, all you need is a large jar, a few tea bags, some filtered water, a SCOBY, and sugar.
 Making Your Own Kombucha
You may be a little intimidated by making your own, but it is not very hard, I promise!
The first thing you need to do before you start is to get a SCOBY. The easiest and cheapest thing to do is find a buddy who is already making kombucha and ask them for a piece of their SCOBY. If you are the first person in your circle of friends and family to make kombucha, then you can purchase a dried SCOBY online and rehydrate it before using it. You can either buy a SCOBY on its own or as part of a kit for kombucha making if you don’t have the other required materials on hand and need to buy them. Once you have your SCOBY and gathered the other materials listed below, you are ready to go!
Materials
- Quart-size, half-gallon-size or gallon-size glass jar (depending on how much you are making)*
- Thermometer
- Tight-weave cloth such as cheesecloth or a paper coffee filter
- Something to secure the cloth or filter over the jar such as a rubber band
- Measuring cups
- Plastic or nylon mesh strainer (it is best to use plastic or nylon because the SCOBY and starter tea should not come into prolonged contact with metal as they are acidic enough to break it down, letting it seep into the tea and the SCOBY; but if all you have is a metal mesh strainer, that should be fine, as it won’t come into contact with the metal for long while straining)
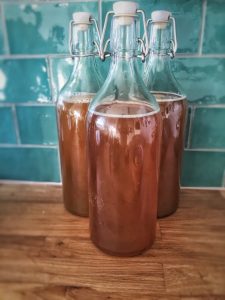
- Flip-top bottles or other airtight bottle/jar for storing after fermentation
Ingredients
- 3 cups filtered water without chlorine or fluoride (I use filtered water from my Berkey filter, but if you don’t have a filtration system you can use bottled spring water)
- ¼ cup organic cane sugar (the bacteria in the SCOBY will eat the sugar, so your finished kombucha will have very little left)
- 2 tea bags (black or green is traditional, but you can use herbal ones as well) or 1 ½ teaspoons loose leaf tea (you can use a metal tea ball to steep your tea if you use loose leaf, but be sure to remove it before you add the SCOBY and starter tea or vinegar)
- ½ cup starter tea from your last batch of kombucha or distilled white vinegar (this must be distilled white vinegar; other types of vinegar like apple cider will not work)
- Active Kombucha SCOBY
- Whatever ingredients you are going to use to flavour it after it has fermented (although you won’t need these for a few weeks, until the kombucha is ready)
*Refer to these conversions from Cultures for Health to determine the amounts needed for larger batches:
Half-gallon batch:
- 1 tablespoon of loose leaf tea OR 4 tea bags
- ½ cup sugar
- 6-7 cups water
- 1 cup starter tea or vinegar
Gallon batch:
- 2 tablespoons loose leaf tea OR 8 tea bags
- 1 cup sugar
- 13-14 cups water
- 2 cups starter tea or vinegar
Procedure
- Boil the water and combine it with the sugar in your glass jar.
- Stir the mixture until the sugar dissolves and steep the tea bags or tea ball in the mixture until it has cooled and the thermometer reads 68-85ºF (you can remove the tea bags earlier if you prefer your tea on the weaker side, but I would leave them in for a minimum of 10 minutes).
- Remove the tea bags or ball from the tea (if you are using a metal tea ball, it is very important to remove it here as the SCOBY and starter tea CANNOT come into prolonged contact with metal, as mentioned above).
- Add your starter tea or the white vinegar to the mixture and stir to combine.
- Add your active kombucha SCOBY.
- Cover the opening of the jar with the cheesecloth or coffee filter and place the rubber band around the lip of the jar to secure the cover.
- Leave the mixture to sit undisturbed in a cool (68-85°F), dark place for 7-30 days (I use a cupboard). The longer you let it sit, the more sugar the bacteria and yeast will eat, so your kombucha will be less sweet and more sour the longer you leave it. Because many of us who have been diagnosed with cancer avoid or limit sugar, I recommend leaving it for closer to 30 days so that there will be very little sugar left. Then, you can sweeten it with a healthier sweetener like maple syrup, coconut sugar, or stevia.
- Once your kombucha is ready, remove the cover and strain your kombucha. You may need to strain it more than once to get most of those little goo strings we talked about. They are totally healthy and fine, just remnants of the SCOBY, so they are actually quite good for you to drink since they are made of healthy bacteria and yeasts, but I won’t blame you for wanting them out of your kombucha if they bother you!
- Save your SCOBY in a glass container with enough kombucha to start your next batch (½ cup or more, depending on how much you plan to make next) or start your next batch right away by following the same procedure and using your freshly made kombucha instead of vinegar. You can do this every time a new batch is ready so that you can ABF (Always Be Fermenting 😆).
 Bottling and flavouring
The possibilities are endless when it comes to flavouring your kombucha, so I really encourage you to experiment with your favourite flavours to find a combo you love. Just make sure that you put aside the amount of starter tea you will need for your next batch BEFORE you flavour and bottle it. As I mentioned above, my favourite flavour is maple ginger blueberry, and you are welcome to give it a try by following these simple steps.
Ingredients
- 1 cup frozen or fresh blueberries
- 1-2 inches of ginger (depending on how strong of a ginger flavour you want), peeled and grated
- ½ cup filtered water
- 2 Tbsp to ¼ cup maple syrup, depending on how sweet you want your kombucha (I recommend starting with less and adding to your taste)
- Funnel
- Flip-top bottles or other airtight bottle/jar
Procedure
- Heat the water in a small saucepan over medium heat and add the maple syrup, stirring to combine.
- Once it is simmering, add the blueberries and ginger, stirring well to combine and leaving to simmer until the blueberries soften and the ginger is fragrant, 6-8 minutes.
- Allow the mixture to cool to 68-85ºF.
- Using the funnel, pour your kombucha into a large, airtight bottle that you have sterilized with boiling water; the flip-top style bottles work the best for developing the fizziness of your kombucha, and you may need to use multiple bottles depending on how much kombucha you have.
- Add the blueberry syrup – blueberries, ginger pieces, and all. Using a funnel can help here too since the flip-top bottles have a narrow opening. If you are using more than one bottle, divide the ginger-blueberry mixture evenly between all bottles. If you made a very large batch of kombucha, you may need to double the flavouring recipe.
- Leave your kombucha out of direct sunlight to infuse with the flavouring. Your kombucha will develop its pleasant fizziness during this time too because it ferments a second time; during the warm months, this should only take 2-3 days, but during the cold months (if you live anywhere with more extreme seasons) this may take up to a week or two, as the cooler room temperature will slow the bacteria. Taste your kombucha every other day to see how the fizziness is developing and stop when it reaches your desired level.
- Once your kombucha is as fizzy and flavourful as you would like it, strain out the solid pieces and pour it back into the bottles, this time putting them in the fridge to stop the fermentation process.
…
 And that’s it! All that’s left to do is enjoy your delicious, healthy new favourite beverage. I like to have it over ice with a few blueberries floating on top. And if your kombucha isn’t sweet enough and too sour for your liking (it can take a little bit to get used to the taste, depending on your flavour preferences), feel free to add a dash of maple syrup or honey when you serve it, although I try to avoid adding additional sugar (even the healthier ones) to my diet in general where possible. If maple ginger blueberry isn’t your thing, you can always drink your kombucha as is without any additional flavouring or sweetening, or you can flavour your kombucha however you would like by following the same procedure above and just replacing the ginger and blueberries with whichever fruits and spices you would like. Try apple cinnamon, orange spice, or lemon ginger. You can also swap out the maple syrup for honey, stevia, coconut sugar, or whichever sweetener you prefer. If you use a granular one, just make sure you dissolve it completely in the saucepan before adding any fruit or spices.
A little side note here that your SCOBY will grow in size each time you make more kombucha. It is even common for new ones to start growing in the same jar as well, so be sure to ask your friends and family if they would like a piece of your SCOBY or one of it’s babies to make their own kombucha too! I always loved this about kombucha, the built-in community aspect and connection that it has. I got my SCOBY piece from a friend’s, who got hers from someone else’s, and so on back for who knows how long. It’s pretty cool to think about the line back and the line forward, connecting all of these SCOBYs that came from the same one originally.
And there’s a lesson there, something to keep in mind during these challenging times when most of us are separated from family and friends. Just because you can’t be with them right now doesn’t mean that the connection isn’t there. Everyone we love and care about is connected to us always, and it is this sense of community connection that will carry us through this time and into whatever our new normal will be afterwards. We will get through this, and now you’ll be ready to raise a glass of kombucha in celebration when we do!
Happy Healing ❤️
References
- Kombucha 101: Demystifying The Past, Present And Future Of The Fermented Tea Drink – https://www.forbes.com/sites/christinatroitino/2017/02/01/kombucha-101-demystifying-the-past-present-and-future-of-the-fermented-tea-drink/#453d0a164ae2
- How Good Gut Health Can Boost Your Immune System – https://www.ecowatch.com/how-good-gut-health-can-boost-your-immune-system-1882013643.html
- The role of gut microbiota in immune homeostasis and autoimmunity – https://www.ncbi.nlm.nih.gov/pmc/articles/PMC3337124/
- Unhealthy gut promotes spread of breast cancer – https://www.sciencedaily.com/releases/2019/06/190610111539.htm
- Health-Promoting Components in Fermented Foods: An Up-to-Date Systematic Review – https://www.ncbi.nlm.nih.gov/pmc/articles/PMC6567126/

0 Comments
Trackbacks/Pingbacks