
Of all the myriad of things I have done in the last two years to help support my body in healing, coffee enemas have got to be the one thing that I get strange looks about the most. And I don’t blame people, because I gave my naturopath the same look when she told me I needed to include them in my protocol. Excuse me, I’m sorry, you want me to put coffee where??
However, I’ve come to love my coffee enemas and the time I put into doing them. It’s almost relaxing for me now, and even though I’m a number of years out from diagnosis and NED, I still do a couple every week. I’ve updated this post as of November 2020 to include new ratios of coffee to water, new equipment to make the process easier, and some common mistakes to avoid. So, let’s get into it!
What are they and what do they do?
Well, it’s exactly what it sounds like. An enema with coffee. For those who don’t know what an enema is, it’s when you put a liquid (usually filtered water or mineral oil) into an enema bag or bucket (pictured above) and then allow that liquid to flow through the tube and into your, ahem, rear end. They are most often used conventionally to help with constipation and to clear out the bowel before a procedure, such as a colonoscopy.
When it comes to coffee enemas however, there is a completely different reason why you should be including them in your treatment or prevention protocol: they are extremely effective in supporting liver and bowel detoxification.
Coffee enemas got a bad rap a little while ago when Gwenyth Paltrow started promoting them and selling the supplies for them via her body care company, Goop. But, this came from a general lack of understanding about the quality of the materials used and the effects and benefits of them. People seemed to think you could just brew some Folgers or Maxwell House and shoot it up there. Nuh uh. Well, I mean, you CAN, but you will definitely experience some issues, which people did.
The critical component of coffee enemas is, you guessed it, the coffee! It is imperative that you use something called Gold Roast coffee from green coffee beans, and it absolutely must be organic and of a high quality (mould free, premium grind, etc.). It is important to also note that this isn’t like a blonde roast or other golden roast; it is important that you get the right one, and the best one comes from a company called S.A. Wilson’s. The reason I use their Gold Roast coffee is that it has been specifically blended and processed with higher levels of caffeine and something called palmitic acid. In fact, it’s not just the processing; the beans themselves are carefully chosen as well for their higher levels of these compounds. You also need to get enema supplies that are BPA free and use an all-natural lubricant. The best place to order supplies from in my opinion is also from S.A. Wilson’s. Their prices are the absolute best, and they’re Canadian! They also have locally roasted, organic, mould-free coffee for drinking.
So, why should I put coffee where you are suggesting, Rebecca? It seems crazy! Fair. The first benefit is one that you often feel after drinking a cup of coffee but amplified, and that would be a stimulation of bowel function. Caffeine and other compounds within coffee are natural stimulants to the intestine, causing the muscles in the colon to contract (peristalsis)1. Expanding the intestines with any liquid also helps to stimulate and improve peristalsis2. These effects both help to move waste material and toxins through the bowels to be eliminated, helping the bowels to naturally detoxify1.
Secondly, coffee itself offers a host of benefits. It is full of phytochemicals like caffeine and caffeic acid that are antioxidants and reduce oxidative stress; has been correlated with an improvement in diabetes, a negative impact on various cancer lines, and an improvement in Parkinson’s and Alzheimer’s diseases; and to act as a safeguard against some malignant cells because of the ability of some of its compounds to modulate detoxifying enzymes in your body3.
There is also a reason that the Gold Roast coffee I use for enemas is particularly high in palmitic acid. It is believed that palmitic acid causes a dilation of the bile ducts in the liver, causing the bile ducts to release into the intestines4. The study referenced by number 4 found that imaging of the small intestine was improved by coffee enemas because more bile was flushed from the participants’ intestines and the fluid was clearer, therefore resulting in better images. Bile contains some of the toxins that your liver has worked hard to remove from your body, so increasing the release of bile into the intestines to be eliminated is an important part of liver detoxification. Bile also aids in digestion, so increasing the flow of bile will also increase proper digestion3.
Finally, during a coffee enema, two palmitic acids travel into the portal vein system, carrying them directly into the liver where they boost the production of the enzyme glutathione s-transferase (GST)2. A study found that kahweol palmitate and cafestol palmitate increased GST activity in both the small intestine and liver of mice5. GST is the body’s master detoxifier and antioxidant; it binds toxins, including chemical carcinogens5, in the liver to reduced glutathione and moves them out of the body via the bowels2, another good reason to improve bowel function.
The bad rap coffee enemas have gotten is also due to the fact that media sources keep referring to two coffee-enema related deaths. One of those deaths was due to an electrolyte imbalance due to frequent use of enemas (people on the Gerson therapy do multiple enemas a day with no complications, so it must have been more than that), and the other was as due to septicemia in a patient with terminal stage breast cancer and a severely compromised hepatic function and immunity4. So, ensure that you hydrate well before and after, and if you have a severely compromised immune system, hold off on the enemas until your immune function improves. It is also worth mentioning that there were no reported adverse events of any kind in the study I have referenced; no headaches, abdominal pain, nothing.
How does my body detox?
The body has many pathways for detoxification. These include through the skin and sweating, through urine, through the exchange of O2 and CO2 in the lungs, and through the bowels. However, our hardest working and most important detox pathway is our liver. Our liver makes use of many different enzymes to break down toxins and then move them out of the body via either the kidneys and then urine, or through the gallbladder, into bile, and then out through the intestines8. So, supporting your liver and bowel detoxification pathways are extremely important, particularly if you are focusing on cleaning up your body after a cancer diagnosis or in order to prevent one.
Why should I detox?
Detoxing is one of my seven pillars of integrative healing, and for good reason. When you change your diet, start exercising more, and are generally making healthier lifestyle choices, you are supporting the overall health of your body in many ways. You are delivering more of the nutrients that they need to your cells, you are getting your lymphatic system moving, you are improving the quality of your sleep, you are likely going to improve fatigue and mental clarity, and, of course, you are supporting your body’s ability to gather up toxins from fat and other tissues6,7.
That’s all really great, but what does your body do with all these newly stirred up toxins? It needs to eliminate them, and if its detoxification pathways are sluggish (particularly the liver and bowels), those toxins that you have worked hard to pull out from their hiding places are just going to float around your body and cause more problems before being reabsorbed. This is why detoxification is such an important part of integrative healing. Without it, you won’t see nearly as beneficial results.
Okay, I’m intrigued, but where do I even start with these?
The first thing is to order all of the supplies that you will need. S.A. Wilson’s has everything, and they have even put together starter kits to make getting going with enemas really easy. They have been doing this for over 20 years, so they know their stuff! The only thing they don’t have is a stainless steel bucket. Their buckets are BPA free (I used one of theirs, pictured above, until I got a stainless steel one), but I still don’t love the idea of putting warm liquid into plastic and then directly into my body. There are lots of options on Amazon for stainless steel enema buckets. I use this one, and it came with a few medical-grade connector nozzles that fit the tubing from S.A. Wilson (I just has to cut a bit off the end to open it up more before inserting it into the S.A. Wilson tubing), but there are many to choose from!
A general list of what you will need (and you can find all of this, except for the metal bucket, at S.A. Wilson for very reasonable prices):
- A stainless steel enema bucket (pictured at the top of the page)
- Medical-grade enema tubing (pictured at the top of the page)
- A clip (most tubing comes with a basic clip, but S.A. Wilson has a really awesome one, the white one pictured at the top of the page, that you can buy separately or as part of a kit that you can operate with one hand; it makes it so much easier and I love it!)
- It’s not 100% necessary, but I use a red silicone catheter (pictured at the top of the page) that attaches to the end of the tubing, again from S.A. Wilson; I find it much smoother and more comfortable to insert, and would recommend it, although I did enemas without it until just a few months ago, so it’s up to you! Don’t forget the connecting piece if you do get the catheter 🙂
- A natural lubricant (S.A. Wilson sells an aloe-based one, but you can also use a bit of olive oil or coconut oil)
- A mat (I use a yoga mat)
- A towel or pillow for under your hips and another for under your head
- Disposable waterproof pads or a garbage bag and paper towels for under your bum
- Gold roast coffee (pictured at the top of the page)
- A mesh strainer
Once you have received your supplies, the next step is to brew the coffee. If you find yourself particularly affected by caffeine, you may want to start with ½ a tablespoon of Gold Roast coffee per litre of water and work your way up to a tablespoon. I am easily affected by caffeine, and when I first started them, I found that I felt kind of nauseous afterwards. I went down to ½ a tablespoon and made sure I hydrated very well by drinking a big glass of water before and after (coffee being a diuretic, enemas can be dehydrating), and I had no more problems. I worked back up to 1 tablespoon over the course of a few weeks with no issues.
To brew the coffee:
- Let 4 ¼ cups of water come to a boil
- Add 1-2 tablespoons of Gold Roast coffee (you can go up to 4 tablespoons, depending on your tolerance, but start with 1 and work your way up; I use 2 now)
- Reduce the heat to medium and let it simmer for 20 minutes
- Using a fine mesh strainer, strain the coffee grounds out of the liquid and discard
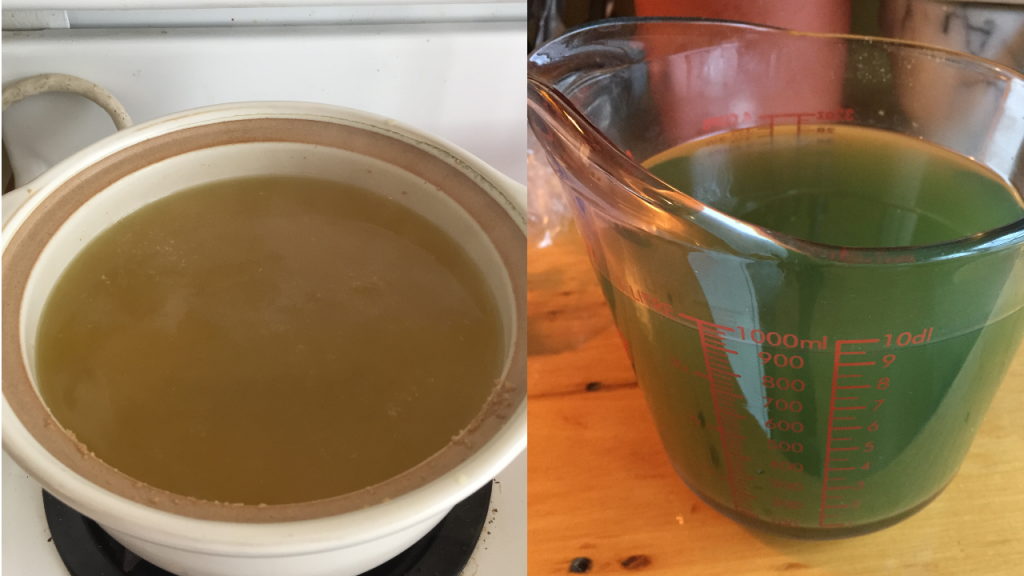
- Let the coffee cool completely before using or storing in a mason jar in the fridge; the coffee should be a warn, golden colour and then turn green as it sits and cools (pictured below)
When you are ready to do an enema:
- If you are using coffee that has been in the fridge, put 2 cups into a sauce pan and heat until just warm (it is very important not to use hot coffee for an enema as burns and discomfort can result); if you are using coffee you have just brewed, let it cool until just warm.
- You will want to do your enemas in the bathroom so that you are in close proximity to a toilet, should you need it immediately, so lay a towel or yoga mat on the bathroom floor.
- Place a garbage bag at one end (where your bottom will be) and then some paper towels on top of that; place a pillow at the top of the mat or towel for your comfort.
- Making sure to check that the clip on the tube is closed, pour two cups of warm coffee into your enema bucket or bag and, using a shower ring, hang the bucket or bag from a convenient location such as the towel rod or a hook on the wall; ensure that the bag or bucket is not so high up that the tube can’t reach down to you. If this is your first few times doing an enema, you can start with 1 cup of coffee and work up to holding 2.
- Open the clip on the tube and let the coffee run down the tube, allowing a little to drain out into the sink or toilet; this will ensure there is minimal air in the tube prior to beginning.
- You are now ready to go! It’s a good idea to try and use the toilet if you can before you begin to reduce discomfort due to “urgency” during the enema.
- Lie down comfortably on your back with your feet flat on the ground and your knees bent. Rest your head on the pillow and ensure that your bottom is on the paper towels and garbage bag. I find it’s helpful to raise my hips with a rolled up towel so that gravity can help me out by keeping the coffee farther from the, ahem, exit point.
- Cover the end of the enema tube in your lubrication of choice (this can be any all-natural lubricant or even coconut or olive oil), and gently insert the tip an inch or so into your anus.
- Holding the tube in place with one hand, use your other hand to release the clip; it is a good idea to keep one hand on the clip in case you need to close it to allow any coffee that has entered your colon to move through and make more space for the rest. If this is the case, you will notice the coffee stops draining from the bag or bucket and you will feel like you need to use the washroom; once the coffee moves through more, this feeling should dissipate and you can resume the flow of coffee.
- Once all of the coffee has drained out of the bucket or bag, you can close the clip and remove the tube.
- The goal is to hold the coffee for a minimum of 12 minutes and a maximum of 15 minutes. “The entire blood supply circulates through the liver every three minutes. By retaining the coffee for 12 to 15 minutes, your blood circulates through your liver four to five times, removing toxins and purifying it much like dialysis”2.
- Once your 12-15 minutes are up, slowly stand and then sit down on the toilet, releasing the coffee and waste material into the toilet bowl. You should be able to tell when there is nothing left to come out (when you stop feeling like you have to use the bathroom), but I would recommend spending a minimum of 5 minutes on the toilet to ensure that you have eliminated all of the coffee from your colon.
- Once the enema is complete, make sure to wash the end of the tube and give the bag or bucket and tube a good rinse by filling it with water, swishing it around, and letting the water drain from the tube into the sink or toilet. At least once a week, it is also a good idea to mix a bit of peroxide and water together and pour that through your equipment as well.
And that’s it! You have successfully completed your first coffee enema ☕️💩 It is entirely normal to notice mucus and even parasites or other undesirables being eliminated with the coffee and in subsequent bowel movements. This is a good thing! It means you are loosening up the waste material that has been sticking to your colon and collecting toxins.
What does it feel like, during and after? What can I expect?
I’m not gonna lie, the sensation does take some getting used to. It feels like you really have to use the washroom, and you’ll have to fight that at certain points; not the whole time, but I find the first 1-2 minutes and the last 1-2 minutes are the most challenging.
Here’s how my experience usually goes:
- I find that the first 1-2 minutes is the most difficult, but just clench like your life depends on it and, if you really have to, you can always release early into the toilet. Sometimes, your colon has its own ideas!
- The coffee will be encountering fecal matter and gas bubbles, and these will push back. The coffee will also be stimulating the bowels and cause it to try and move things out versus keep them in. Raising your hips further and massaging your stomach in a counterclockwise direction helps to move the coffee further in and around any obstacles, reducing the urgency of the sensation.
- A little coffee might leak out, but that’s what the paper towels and garbage bag are for.
- The middle 10 minutes is usually pretty easy for me; I read or watch Netflix on my phone.
- The last 1-2 minutes can be a bit of a challenge again, almost like my body knows it’s almost time to release! Again, lifting your hips up further and massaging your stomach in counter-clockwise circles can reduce that discomfort, as does working to relax your abdominal muscles instead of pushing against the sensation.
- A few times I’ve just not been able to hold it any longer and have had to throw in the towel early, but usually the 15 minutes is entirely doable, particularly now that I’ve been doing these for so long.
- If you are finding it really difficult to hold, try inserting one cup of plain filtered water first, holding it for a couple of minutes until the sensation to “go” increases, and then release into the toilet before then inserting the coffee. It clears out the immediate section of your colon and can make the coffee enema much easier to hold.
Some common mistakes that you should avoid:
- Using a plastic bucket versus a metal one, which I addressed up above.
- Not disinfecting your equipment regularly. You want to make sure you are disinfecting your bucket and tubing, not just the tip of the tubing, after EVERY use, which is something people often skip. I rinse the bucket and then let a bunch of water flow through the tubing from the bucket and into the sink. Then, I pour about 2-3 tablespoons of hydrogen peroxide into the bucket, swish it around, and then let that run through the tube and into the sink. Then I rinse the bucket well, let at least 2 cups of fresh water run through the tubing to ensure all the peroxide is gone, and then hang the bucket up with the tube hanging into my bathtub to ensure as much remaining water in the tube flows out, minimizing the moisture sitting in the tube.
- Not replacing the tubing regularly. You want to make sure that you are replacing the tubing pretty often. It will depend on how many of these you are doing a week, but at the first sign of any mildew growing in the tube, which can happen because some moisture always remains, you need to replace it. Check out the tubing before every enema, and if you see any discolouration anywhere along the length, replace it. I like to buy a few lengths of tubing at a time so that I always have a new one on hand.
The other thing I will mention is that I feel freakin’ FANTASTIC after a coffee enema. I don’t know if it’s the caffeine boost, endorphins, or what, but it is similar to the “high” you feel after exercising. Life is good, and I feel like a brand new woman! Any discomfort is totally manageable and totally worth it. As a final note, you will want to avoid doing coffee enemas in the evening if you are sensitive to caffeine; it can be enough to keep you awake at night if you do these too close to bedtime.
There is also something to be said for the potential of washing away too much of your good bacteria if you are doing these often. To counteract this, you can do a nutritive enema once a week, which follows the same process but instead of coffee uses 2 cups of filtered water with 2-3 tablespoons of both aloe and chlorophyll and a capsule of probiotics mixed into it. You can even add what I call “flax goo”, which you get by boiling 1.5 tablespoons of flaxseed in 2 cups of water for 20 minutes. Then strain out the seeds, add enough filtered water back in to get two cups of liquid, then add your aloe, chlorophyll, and probiotics. This combo is very soothing and reparative to the intestinal lining and also replenishes your good gut bacteria.
And that’s coffee enemas! They aren’t everyone’s cup of tea (or should I say coffee 😜), and that’s totally your call; but I promise that you really will get used to them, and after the first few they will feel like no big deal. If you have absolutely any questions at all about coffee enemas and my experience with them, please leave a comment below, comment on the Facebook group’s wall, or send me an email through the Contact Me page, and I would be more than happy to answer them.
Happy Butts and Happy Healing! ❤️
References
- https://draxe.com/coffee-enema/
- https://drknews.com/coffee-enema/
- https://www.ncbi.nlm.nih.gov/pubmed/21432699
- https://www.ncbi.nlm.nih.gov/pubmed/25136541
- http://cancerres.aacrjournals.org/content/42/4/1193
- https://www.livestrong.com/article/206993-exercise-for-detox/
- https://maxliving.com/healthy-articles/natural-body-cleanse
- https://www.greatplainslaboratory.com/gpl-blog-source/2016/6/6/your-bodys-detoxification-pathways

0 Comments
Trackbacks/Pingbacks